
Photography enables you to, effectively and often instantly, capture and convey stories, emotions, and memories visually. You could be a beginner with a smartphone or an enthusiast with a DSLR camera, it is important to understand these 5 key principles of photography before you start clicking away and creating compelling and scroll-stopping photos. In this blog, we’ll explore the fundamental principles of photography that will definitely level up your photography game.
1. Composition
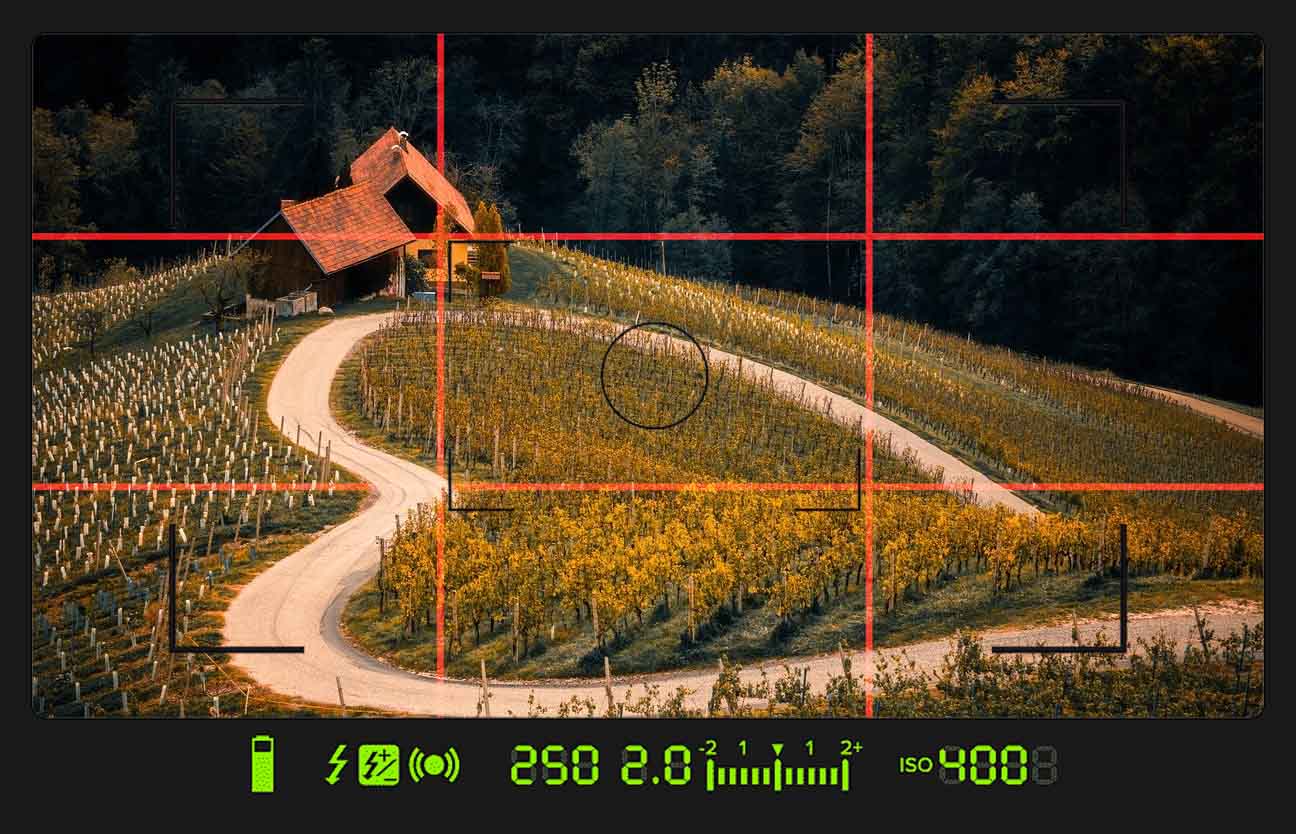
What do you choose to include or exclude in the frame is known as Composition. It is important how you organize the subject, background, and other elements to create a visually appealing image. Photography heavily relies on the composition techniques of fine arts that are used by artists, so it is also a good idea to go through the art books for reference and in-depth knowledge. Although you will be breaking these rules later, it is best to start somewhere safe. There are several techniques to help you guide with creating a balanced composition:
- Rule of Thirds: Your frame can be divided using two horizontal and two vertical lines, equidistance from their respective end. And place your subjects where these lines intersect. Play around with the subject and position in the intersection and observe what works best.
- Leading Lines: Use any two sets of line-representing object such as roads, fences, rivers, pathways, and place your subject along the line. This can lead the viewer’s eye towards the subject.
- Framing: Surround your main subject with elements like trees, branches, archways, windows, anything that is available to add depth and story.
- Symmetry: Symmetry is naturally visually pleasing as the balance creates a soothing feeling to the human eye. Try to balance the image on the both sides by dividing the frame into two halves with an imaginary line.
- Patters: Any repetitive element in the frame will create a pattern. Human are naturally adapted to find and recognize pattern so this will help in creating captivation images.
2. Lighting
The photo in photography refers to light. The word photography literally means writing with light. Light is the soul of photography. And understanding how light works and how to use it to your advantage is crucial to any photographer or all skill levels. Light can dictate the mood and atmosphere of your photos. The difference can be of night and day if you know how to use it right, pun intended.
- Natural Light: The sun, or the moon if it is bright enough, can be considered natural light. The sun have varying qualities of light depending on the different times of the day. Warm light in the morning, harsh daylight and warm golden light in the evening, often referred to as “golden hour”. Also, the reflected sunlight from walls or floor can be used too. Experiment with all situations throughout the day. Analyze the different qualities of natural light and create different atmosphere in the image. Notice that your camera’s exposure settings will change according to the light.
- Artificial Light: You might have noticed big umbrellas or white boxes that made you blink in the studio while taking a picture for your passport or ID cards. Those flash lights or studio lights are called artificial lights and they are there to mimic the natural light. These can be modified and shaped the way you want with full control of intensity and softness. Alternatively, any available sources such as house lamps, candles, flashlight can be used too. Shoot using all the available sources and observe how it affects your images, the quality of highlights and the shadows.
- Shadows: Shadows give shape to an object which can otherwise appear flat. Shadows provide an image with dimension and a sense of space and depth. By using different kinds of light source, different forms of shadow can be achieved. And each type of shadow will illicit a different emotion on the subject, be it anything.
3. Exposure
Exposure is the amount of light that is registered on your camera’s sensor (or film). It decides how bright or dark your picture will appear. When done right, your picture will retain all the details and look delicious to the eyes. Exposure can be controlled using the following three elements, often known as the holy trinity of exposure triangle:
- Aperture: The opening of lens is known as aperture or f-stop. It determines how much light enters the camera and it also affects depth of field i.e., the length of plane which stays in focus. Aperture is also used to create a blurry background or to keep larger part of the camera in focus.
Click here to learn about aperture and different settings to use in different scenarios.
- Shutter Speed: Shutter speed refers to the duration of which your camera’s shutter remains open and the sensor is exposed to light. Faster the shutter speed, the lesser time the camera sensor will be exposed and thus will capture fast moving objects, freezing motion. Slower shutter speed will let in more light but will end up with a blurry and shaky image unless the camera is held completely stationary. Experiment with different shutter speed and you will be surprised with the results!
- ISO: ISO refers to the sensitivity of camera’s sensor or film to the light. Higher ISO settings will make the image appear brighter but will introduce noise and result in less detailed image if the light is not sufficient. Raising the ISO on your camera will digitally boost the image’s brightness and a high ISO is generally used in low light or dark environment.
4. Focus
Alright! Now you have your exposure set, found a great light source and your subject is eagerly waiting to be photographed, what next? A sharp image is always preferred to create a compelling photograph, unless you are shooting for a different vibe or genre. The main subject always stays in focus as it helps to draw the viewer’s eye. Focus can be adjust both manually and automatically on most cameras. Even on a smartphone, if you have pro-mode, it will allow you to manually set focus which will come handy in many scenarios. Understanding how to use all the auto focus modes in your camera is essential and will save a lot of time and you will not miss your shot trying to find the correct focus mode and end up with blurry photos. Remember! Lightening does not strike twice on the same spot so you better learn your camera’s focus modes. Refer to your camera manual as this is the best way to learn it. Also remember that aperture affects the plane of focus so use it in conjunction with focus of your camera. Some key aspects to consider while focusing are:
- Manual Focus: As the name suggests, you adjust the focus manually and take control of what stays in focus. This mode allows you to take full control over what’s in focus. Manual focus often comes in handy when the subject is really small or is tricky for your camera to focus, usually in low light.
- Depth of Field: Adjusting the aperture affects the depth of field as it determines how much of the scene is in focus. Wide apertures (small f-stop numbers) create a shallow depth of field (short focus plane, used in portraits), while narrow apertures (large f-stop numbers) result in a deep depth of field (longer focus plane, used in group photos or landscapes).
5. White Balance
White balance is often overlooked by beginners as it appears to give your image bluish tint or yellowish tint. But white balance ensures that colors in your photos appear accurate and true to life. Different lighting conditions will cast various colors of light such as a warm bulb will give a yellow color cast and a tube light will have bluish color cast. Adjusting the white balance settings on your camera helps correct these color casts and saves you from the hassle of editing later. And even RAW images can only retain so much information so adjusting white balance while you shoot is always recommended.
Always remember these key principles of photography
Of course, the sky is the limit, the world is your oyster, bla bla bla but like any skills, mastering the basic principles is a vital step in your journey. After mastering these basic steps, you can further explore and go down the rabbit hole of the above-mentioned headings. Every other aspect is just a derivative of these principles. And along the way you will discover much more than anyone can ever teach you!
The more you practice, the more mistakes you make. And with every mistake, you will discover something new and improve upon. And remember that even pros struggle with getting a good picture sometimes so just relax and enjoy the art of photography rather than stressing upon getting a picture-perfect image every time.